
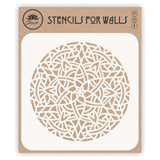


Arabic Mandala Stencil- Islamic Mosaic Arabic Geometric Design
TB2976S
If you haven't got the stamina for a whole wall a combination of similar stencils can add a bright splash of color. Large stencils make a stunning accent on an empty wall, try them near a sofa or table or even by the skirting board of pretty much any wall space that needs that extra something.
Stenciling is fun for the whole family but BEWARE it is very addictive!
HOW TO STENCIL
Virtually any paint can be used to stencil with, but the two most popular types are Acrylic and Dry-brush Oil.
Preparation
Always make sure that the surface to be stencilled is clean and properly prepared with no flaking paint.
Instructions
Spray the back of the stencil lightly with spray glue and position the stencil on the chalk line or registration mark.
Paint: Dip your brush or sponge into the paint then, wipe off most of it on a piece of kitchen paper. If you use too much paint you will find that it bleeds behind the stencil, giving the pattern very ragged edges.
Apply the paint using an up and down stippling motion, start on the outside of each of the stencils cut outs and work your way in towards the middle.
Clean-up: Wash your stencil frequently in hot soapy water, especially when changing colour. Don't forget to check for paint on the back of the stencil. To remove oil paint and glue from your stencils and brushes soak them in turpentine for a few minutes.
Virtually any paint can be used to stencil with but the two most popular types are Acrylic and Dry-brush Oil.
Preparation
Always make sure that the surface to be stenciled is clean and properly prepared with no flaking paint.
Instructions
Spray the back of the stencil lightly with spray glue and position the stencil on the chalk line or registration mark.
Paint: Dip your brush or sponge into the paint then, wipe off most of it on a piece of kitchen paper. If you use too much paint you will find that it bleeds behind the stencil, giving the pattern very ragged edges.
Apply the paint using an up and down stippling motion, start on the outside of each of the stencils cut outs and work your way in towards the middle.
Clean-up: Wash your stencil frequently in hot soapy water, especially when changing color. Don't forget to check for paint on the back of the stencil. To remove oil paint and glue from your stencils and brushes soak them in turpentine for a few minutes.
INFORMATION
If you don’t have the stamina for a whole wall a combination of like stencils can add a bright splash of color. Large stencils make a stunning accent on an empty wall, try them near a sofa or table or even by the skirting board of almost any wall space that needs that extra something.
- Reusable Wall Stencil Template - Use on Posters Cards Scrapbooking Journals WALLS Floors Fabric Furniture Glass WOOD
- Stenciling is one of the easiest and CHEAPEST ways to decorate - update your look by using different colors, motifs and patterns.
- ECONOMICAL alternative to wallpaper and decals - you only need to buy one and you can cover a whole wall.
- Suitable for use with ANY PAINT or stenciling method - use 1 color or a mixture of colors and clean up with soapy water.
- Made from 190 or 250 micron Mylar, the ORIGINAL stencil film NOT clear plastic you only see once you start painting.
- FREE Stencil Included with Every Purchase! CHECK SIZE BEFORE ORDERING!
ANYONE CAN STENCIL
Using laser cut Mylar film and paint; it is easy for even the beginner to produce stencil work of very HIGH QUALITY on Furniture, Walls, Floors, Fabrics, Windows and almost any other flat surface. Also your stencil comes with either registration marks or overlaps for easy line-up.
Our Rice Paper is perfect for both beginners and advanced crafters! It is much easier to work with than classic napkins. The paper is handmade, 100% natural and acid free. It is water and fade resistant as well as being very thin, lightweight 30gsm, semi-transparent and naturally white.
Mulberry rice paper is the original decoupage paper. It typically contains clearly visible fibers of irregular size, arranged in all directions all over the paper surface, giving it an original and interesting look.
You can use these papers for decoupage, scrapbooking, collage art, journaling, and furniture, whole or cut up. If you tear rather than cut, the edges will blend beautifully into the background. The colors of the images appear most vibrant when applied over white or light backgrounds.
WHAT YOU GET: 6 images measuring 8 x 10.5” inch printed onto 6 sheets of A4 Mulberry Rice Paper. The images are all different but adhere to a theme, like color, style or type. Just remember color varies greatly from screen to screen.
PLEASE NOTE: This is NOT food grade rice paper and is NOT edible! We cannot guarantee that the color you see on your screen accurately portrays the true color of the product.
DECOUPAGE is the art of decorating an object by gluing colored paper cut-outs onto it in combination with special paint effects, gold leaf and other decorative elements. Commonly, an object like a small box or an item of furniture is covered by cut-outs from magazines or from purpose-manufactured papers. Each layer is sealed with varnish (often multiple coats) until the "stuck on" appearance disappears and the result looks like painting or inlay work. The traditional technique used 30 to 40 layers of varnish which were then sanded to a polished finish.
IT’S MUCH EASIER NOW: Just apply mod podge to the surface of your object then smooth on the rice paper. Starting in the center of the sheet and push outwards with a cloth ball or fingers to eliminate wrinkles and bubbles. Coat with mod podge or other finishing medium and allow to dry.
You may also be interested in.....


